B12 Shots at Home: Safe, Effective Self-Injection Step-by-Step Guide

Medically reviewed by Micaela Strevay, FNP-C, PMHNP-BC
Table of Contents
Understanding B12 Self-Injection: A Complete Guide
At home B12 injection is a safe, effective way to maintain optimal vitamin B12 levels without frequent clinic visits. For those considering this option, here's what you need to know:
- Equipment needed : 1-3ml syringe, drawing needle, injecting needle, B12 ampoule/vial, alcohol swabs, gauze, sharps container
- Injection site options : Outer thigh (vastus lateralis), upper arm (deltoid)
- Frequency : Typically weekly for 6 weeks initially, then every 2-3 months for maintenance
- Safety : Must have a prescription and proper training before starting
At home B12 injection offers significant advantages over oral supplements, particularly for those with absorption issues or specific health conditions.
According to recent patient surveys, 92% of patients using at home B12 injection reported noticeable improvements by their second check-in, with 88% experiencing increased energy levels and 85% reporting reduced fatigue.
Up to 15% of Americans lack sufficient B12 levels, with deficiency risks higher among vegans, older adults, and those with certain medical conditions like pernicious anemia or digestive disorders.
While oral supplements are convenient, they must pass through the digestive system where absorption can be limited—especially for those with gastrointestinal issues. At home B12 injection bypasses this problem by delivering the vitamin directly into muscle tissue for maximum bioavailability.
I'm Joseph Lopez AZIVM, a healthcare professional specializing in mobile IV therapy including at home B12 injection services for over 8 years, helping countless patients safely administer their own B12 injections. My experience has shown that with proper training, most patients can confidently manage their B12 supplementation at home.

Vitamin B12 & At-Home Injection Fundamentals
Ever wonder why that little red vitamin in your syringe is so important? Vitamin B12, or cobalamin as the scientists call it, is truly one of your body's best friends. This water-soluble powerhouse doesn't just give injectable B12 its distinctive ruby color (thanks to the cobalt it contains) – it's actually working behind the scenes in nearly every cell of your body.
Your amazing body can do many things, but making its own B12 isn't one of them. We need to get it from outside sources, typically animal foods like meat, fish, and dairy. Here's where things get tricky – even with a perfect diet, many of us struggle with absorption. Your stomach produces something called "intrinsic factor," a special protein that helps your body absorb B12 from food. Without enough of this helper protein, you could be eating all the right foods and still come up short.
This isn't a rare problem, either. Research shows that approximately 15% of Americans don't have adequate B12 levels. For some groups, the numbers are even more concerning – up to 90% of vegans and vegetarians may be deficient without proper supplementation. It makes sense when you think about it – most natural B12 comes from animal products.
When it comes to injectable B12, you'll typically encounter three main forms:
- Cyanocobalamin : The standard synthetic version that's stable and budget-friendly
- Methylcobalamin : A more bioactive form that some health practitioners prefer
- Hydroxocobalamin : Sticks around in your body longer, making it popular for muscle injections
Why choose an at home B12 injection over a simple pill? It all comes down to absorption. Oral supplements must steer your entire digestive system, where absorption can vary wildly from just 1.2% to 40% depending on your individual health factors. In contrast, injections deliver B12 directly into muscle tissue where it's almost completely absorbed. For people with serious deficiencies or absorption issues, this difference can be life-changing.
Why B12 Matters for Every Cell
B12 is like that essential team member who quietly keeps everything running smoothly. Without enough B12, your DNA synthesis goes haywire – and since DNA is your body's instruction manual, this affects literally every cell you have.
This humble vitamin is particularly crucial for red blood cell formation. When B12 is lacking, your body produces oversized, dysfunctional red blood cells, leading to a condition called megaloblastic anemia. Your nerves depend on B12 too – it helps maintain the protective myelin sheath that insulates nerve fibers, similar to how rubber coating protects electrical wires.
B12 also plays a key role in managing homocysteine levels in your blood. This might not sound exciting, but it's actually really important – liftd homocysteine has been linked to increased heart disease risk, so keeping it in check matters for your cardiovascular health.
The sneaky nature of B12 deficiency makes it particularly dangerous. As Harvard Health points out, symptoms often develop so gradually that you might not notice them, or you might attribute them to aging, stress, or other conditions. That subtle onset means many people suffer unnecessarily for years before getting proper treatment.
Oral, Sublingual, IV or At Home B12 Injection—Which Absorbs Best?
Not all B12 supplementation methods are created equal. The way you take your B12 dramatically affects how much actually makes it into your system where it can do its job.
| Method | Absorption Rate | Advantages | Disadvantages |
|---|---|---|---|
| Oral pills | 1.2-40% depending on intrinsic factor | Convenient, widely available | Poor absorption, especially with age or GI issues |
| Sublingual | Slightly better than pills | No need for intrinsic factor, easy to use | Still less effective than injectable forms |
| In-clinic IM injection | Nearly 100% | Highly effective, professionally administered | Requires clinic visits, potential travel and waiting time |
| At home B12 injection | Nearly 100% | Highly effective, convenient, no travel needed | Requires training, prescription, and comfort with self-injection |
| IV infusion | 100% | Immediate delivery to bloodstream | Most expensive, requires professional administration |
For many people – especially those with serious deficiencies, digestive disorders, or pernicious anemia – at home B12 injection offers the sweet spot of effectiveness and convenience. You get the same near-perfect absorption as clinical injections without having to schedule appointments, drive to a facility, or sit in waiting rooms.
Of course, starting an at home B12 injection routine does require a prescription and proper training. But for those who make the switch, the combination of convenience and effectiveness often makes it well worth the initial learning curve. At AZ IV Medics, we frequently see patients who've tried numerous oral supplements with minimal results experience significant improvements after switching to injectable B12.
Candidate Checklist, Dosage & Frequency Guidelines
Wondering if you might benefit from at home B12 injection ? You're not alone. While not everyone needs this form of supplementation, certain groups face a much higher risk of B12 deficiency.
You might be an ideal candidate if you're following a vegan or vegetarian lifestyle (plants don't naturally contain B12), or if you've been diagnosed with pernicious anemia (where your body attacks the cells needed to absorb B12). Those who've undergone bariatric surgery or have conditions like Crohn's disease, celiac disease, or inflammatory bowel disease often struggle with B12 absorption too.
Long-term use of certain medications can also deplete your B12 levels. If you take metformin for diabetes or use proton pump inhibitors for acid reflux, your doctor might recommend monitoring your B12 status. And if you've celebrated your 50th birthday, your body naturally becomes less efficient at extracting B12 from food – just one of those unwelcome aging "perks" we all look forward to!
Other candidates include people who've experienced nerve damage from nitrous oxide exposure (sometimes called "laughing gas neuropathy") and those battling unexplained fatigue or neurological symptoms that haven't responded to other treatments.

Most at home B12 injection protocols use a standard dose of 1000 mcg (1 mg) per injection. This might sound high compared to the NIH's Recommended Dietary Allowance of just 2.4 mcg daily for adults, but don't worry – the injection method allows for safe delivery of these higher doses, and B12 is water-soluble, meaning your body efficiently eliminates any excess.
Good news for the needle-nervous: research supports the safety of this approach. A recent UK cross-sectional survey published in the British Journal of General Practice found that self-administered B12 injections are both safe and effective when patients receive proper training – with very few complications reported.
Signs You Might Need an At home B12 injection
B12 deficiency can be sneaky – it often creeps up gradually, with symptoms that might be mistaken for other conditions or just "getting older." Your body might be waving these red flags if you're running low:
That tingling or numbness in your hands and feet? It's not just poor circulation – it could be B12-related nerve issues. Brain fog and trouble concentrating might have you blaming stress, but your B12 levels could be the real culprit. And that bone-deep fatigue that coffee can't touch? Classic B12 deficiency.
Physical changes can also appear: a surprisingly pale complexion , a swollen and sore tongue (called glossitis ), or persistent mouth ulcers. Even your mood might shift, with unexplained depression or irritability. Some people even notice blurred vision or changes to their eyesight.
If these symptoms sound familiar – especially if you're in one of the high-risk groups – it's time for a conversation with your healthcare provider. A simple blood test can check your B12 levels and help determine if at home B12 injection therapy might help you feel like yourself again.
How Often Should At home B12 injection Be Given?
B12 injection schedules typically follow a two-phase approach – think of it like filling an empty tank and then maintaining the proper level.
During the initial loading phase , you'll receive more frequent injections to quickly restore your B12 levels. If you're severely deficient, your provider might recommend injections every other day for 1-2 weeks. For moderate deficiency, once or twice weekly injections for 4-6 weeks usually does the trick.
Once your levels improve, you'll shift to a maintenance phase . If your deficiency stems from a condition like pernicious anemia that permanently affects absorption, you'll likely need injections every 1-3 months for life. For dietary deficiencies, maintenance injections continue until the issue resolves, with periodic testing to monitor your levels.
Those with neurological symptoms often need more frequent injections until symptoms improve – your brain and nerves are precious cargo that need consistent B12 support to heal properly.
Your personal injection schedule will be custom based on your initial B12 levels, the underlying cause of your deficiency, how well you respond to treatment, and ongoing blood test results. It's crucial to stick with your prescribed schedule and not adjust your dosing without medical guidance.
With proper monitoring and the convenience of at home B12 injection , maintaining healthy B12 levels becomes one less thing to worry about – leaving you more energy to focus on living your best life.
Preparation & Supplies for At Home B12 Injection
Getting ready for your at home B12 injection should feel less like a medical procedure and more like a simple self-care routine. Think of it as setting up a little wellness station in your home—one that just happens to involve a needle!
Before you begin, gather everything you'll need in one clean, quiet spot. Here's your shopping list for success:
- Syringe : A small 1 ml to 3 ml syringe works perfectly
- Two needles : A purple drawing needle (21G) to pull the B12 from its container, and a thinner blue (23G) or green (21G) needle for the actual injection
- B12 medication : This comes in either a glass ampoule or rubber-topped vial (remember, this requires a prescription!)
- Alcohol swabs : To clean both the injection site and vial top
- Gauze or cotton balls : Just in case there's a tiny bit of bleeding
- Adhesive bandage : Optional, but nice to have on hand
- Sharps container : This isn't optional—you'll need a proper container for safe needle disposal
- Clean gloves : Not absolutely necessary, but recommended if you have them

In the US, you can't just pick up B12 injections at your local pharmacy without a prescription. Here at AZ IV Medics, we can connect you with healthcare providers who'll evaluate whether B12 therapy is right for you and provide both the prescription and proper training. Feel free to check out our B12 injections page for more details.
Setting Up Your Safe Injection Station
Creating your B12 injection space doesn't require a medical degree—just a bit of common sense and preparation:
Find a quiet corner with good lighting where you won't be interrupted. Clear off a clean surface and lay out all your supplies within easy reach. Wash your hands thoroughly with soap and water for at least 20 seconds (about the time it takes to hum "Happy Birthday" twice).
If you're using gloves, put them on after your hands are completely dry. Make sure any curious children or pets are safely away from your injection area—this is definitely not a spectator sport!
B12 is a bit of a diva when it comes to light—it's quite sensitive to it. Keep your ampoules in their original packaging until you're ready for action. If you're using a multi-dose vial, follow the storage instructions on the label, but generally, room temperature and away from sunlight is the way to go.
Storing and Inspecting Your B12 Vials
Think of your B12 as a houseplant that prefers shade and moderate temperatures. Store it at room temperature (between 59°F and 85°F) in a dark place—those amber-colored bottles aren't just for looks, they actually help protect the vitamin from light degradation.
Before each injection, take a moment to check the expiration date. Then inspect the solution itself—it should be clear and have a beautiful red or pink color. If you notice cloudiness, floating particles, or an unusual color change, that's your cue to discard it and use a fresh supply.
Most B12 preparations have a shelf life of 18-24 months when properly stored. However, once you've opened a multi-dose vial, it typically remains good for about 28 days—but always follow your pharmacist's specific guidance on this.
And of course, keep all your supplies safely tucked away from little hands and curious paws. Your at home B12 injection supplies should be treated with the same care as any medication in your home.
With everything properly prepared, you're all set for a smooth, comfortable injection experience. Taking these simple steps helps ensure your B12 therapy is both safe and effective—and with practice, the whole process will become second nature.
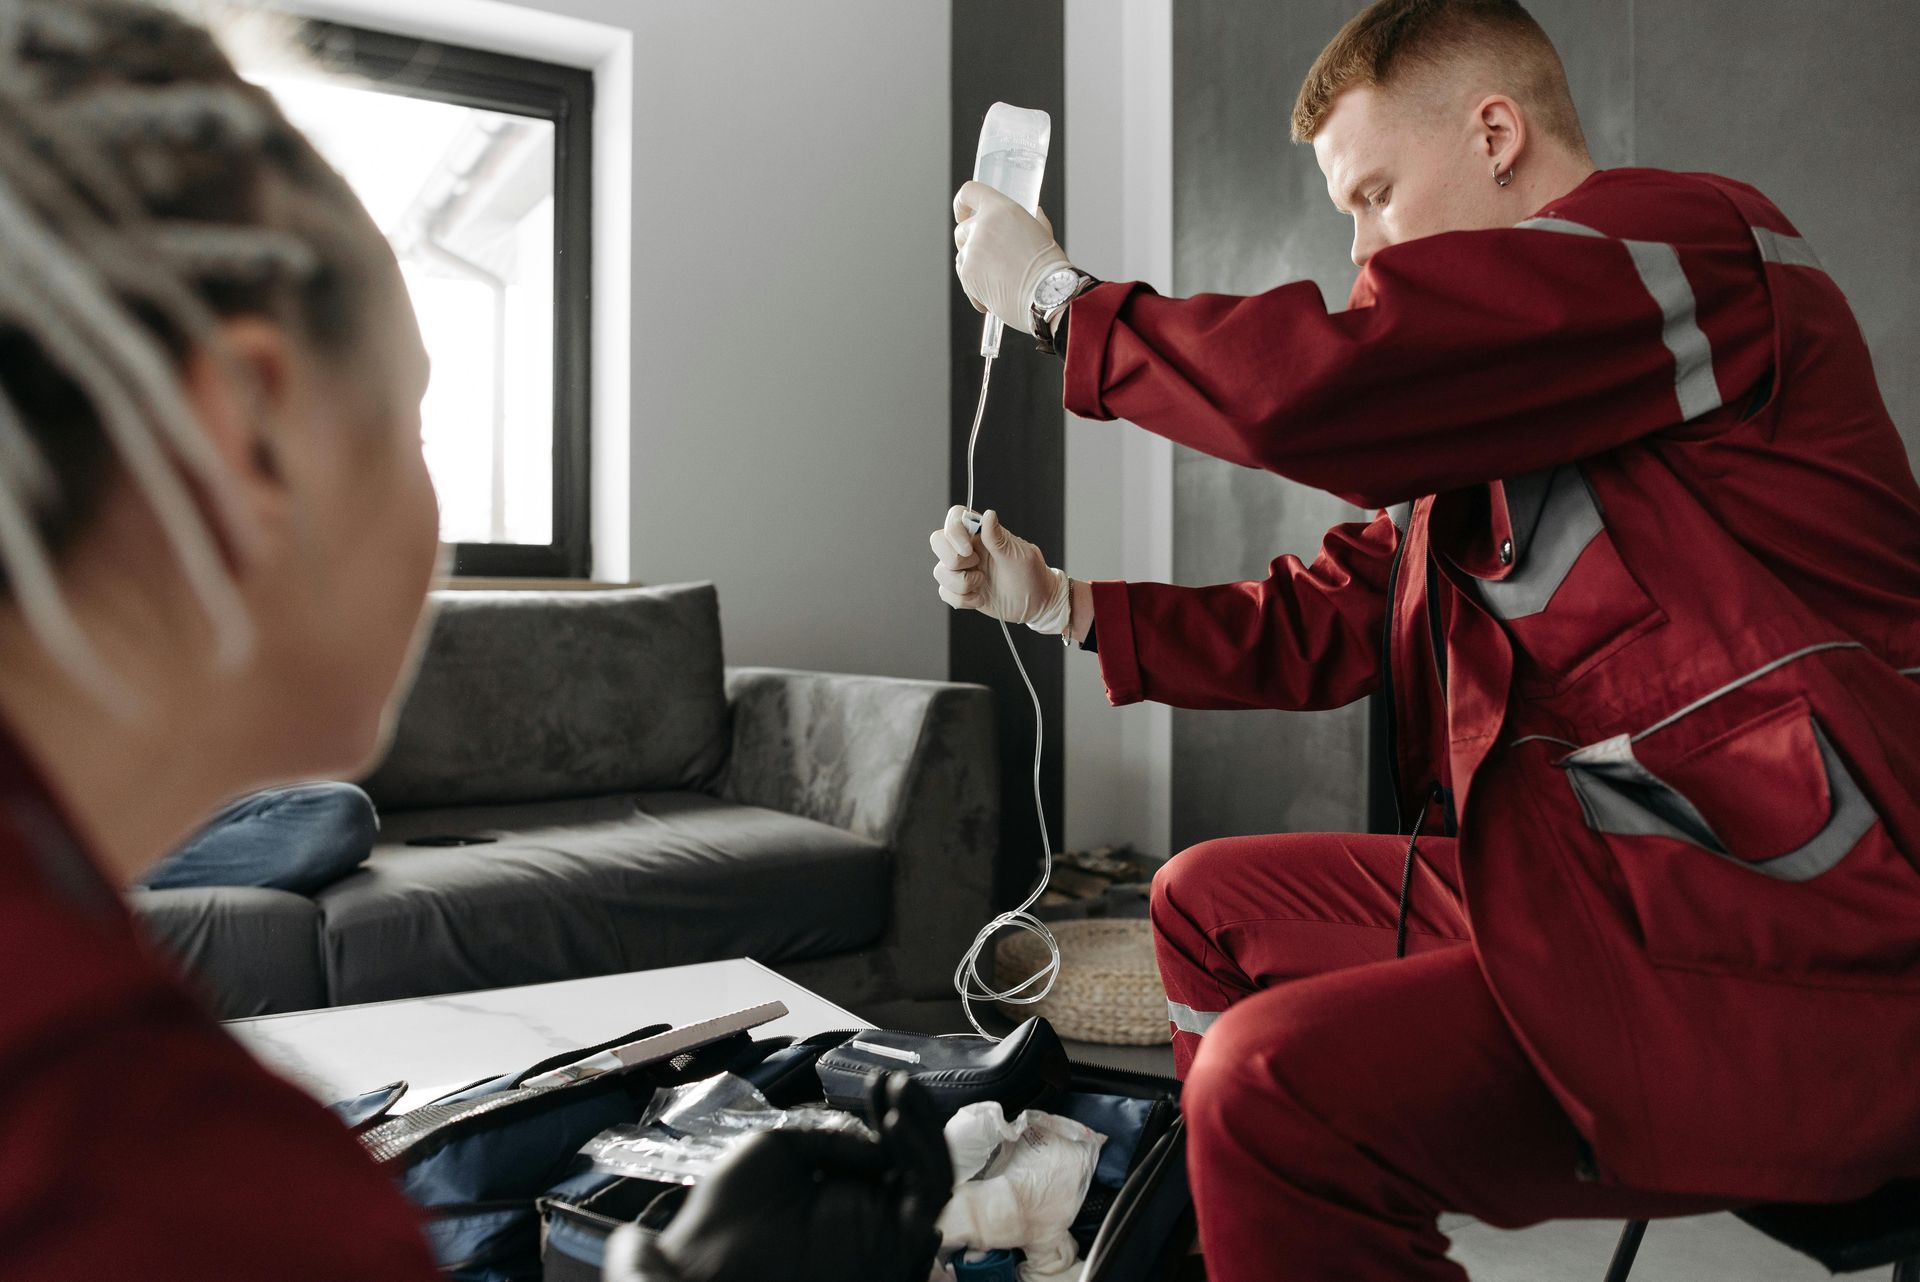
How to Perform an At Home B12 Injection
Now for the main event: actually administering your At home B12 injection . I've guided hundreds of patients through this process, and with the right technique, it can be quick and nearly painless.

Let's walk through this step by step, just as I would if I were sitting beside you for your first injection.
First, prepare your medication. If you're using a vial with a rubber top, wipe it thoroughly with an alcohol swab and give it about 30 seconds to dry completely. For glass ampoules, tap the top gently to ensure all the precious B12 liquid settles at the bottom. Wrap an alcohol swab around the neck for protection, then snap the top away from your body (that little black dot should face away from you). Immediately drop the ampoule top in your sharps container—safety first!
Next, it's time to draw up your medication. Attach your drawing needle (typically the purple one) to your syringe. If using a vial, you'll want to inject air equal to the amount of medication you'll be taking out—this prevents vacuum pressure from making withdrawal difficult. Insert the needle through the cleaned rubber top, inject the air (above the liquid level), then flip the vial upside down and withdraw your prescribed dose.
For ampoules, it's simpler—just insert the needle and pull back the plunger to withdraw your dose (typically 1 ml). Either way, check for air bubbles by gently tapping the syringe and pushing the plunger slightly to expel any air. Once your dose is ready, safely dispose of the drawing needle and attach your injecting needle (usually blue or green).
Now, let's prepare for the actual injection. The vastus lateralis muscle on your outer thigh is ideal for At home B12 injection —it's easy to reach, has fewer nerve endings, and absorbs medication well. Find the middle third of your outer thigh (imagine placing your palm on your hip bone—the injection site is where your fingertips reach on the outer side). Clean this area with a fresh alcohol swab and let it dry completely.
When you're ready to administer, hold the syringe like a dart. With your free hand, gently stretch the skin at the injection site. Take a deep breath and insert the needle at a 90-degree angle in one confident motion. I always tell my patients: hesitation increases discomfort, so channel your inner healthcare professional!
Once the needle is in, pull back slightly on the plunger to check for blood (we call this aspiration). If you see blood, it means you've hit a blood vessel—simply withdraw, safely dispose of the needle, and start over with fresh supplies. No blood? Great! Slowly push the plunger to inject the medication—take your time here, about 5-10 seconds for 1 ml. This slow delivery significantly reduces discomfort.
After the medication is delivered, remove the needle in one smooth motion and apply gentle pressure with gauze if needed. Immediately place the used needle and syringe in your sharps container and give yourself a pat on the back—you did it!
Remember to record the date, time, and injection site in a log. This tracking helps ensure you're rotating sites properly, which prevents tissue damage. If you inject weekly, simply alternating between left and right thigh is usually sufficient.
Drawing the Dose Like a Pro
Drawing up your B12 medication properly ensures accuracy and safety. Think of it as the preparation that pays off during injection.
Your drawing needle is typically larger (21G purple) for good reason—it makes withdrawal easier, especially from vials with rubber stoppers. Treat this needle with respect: don't touch its tip or the inside of your ampoule/vial to maintain sterility.
Those tiny air bubbles might seem harmless, and while small ones won't hurt you, they can affect dosage accuracy. To eliminate them, tap the syringe barrel gently and push the plunger slightly to expel the air. I always recommend changing needles after drawing—the drawing needle becomes dull after puncturing the vial top, and a fresh needle makes for a more comfortable injection.
When working with glass ampoules, hold it upright and tap the top to ensure all medication moves to the bottom. Use an alcohol swab to protect your fingers while snapping it off—this maintains sterility and prevents cuts. Draw up slightly more than needed, then adjust to the exact dose after removing air bubbles.
For multi-dose vials, always clean the rubber top with a fresh alcohol swab before each use, even if you're the only person using it. This simple habit prevents contamination that could lead to infection.
Giving the Shot: At home B12 injection Technique
The actual injection technique makes all the difference between "that wasn't bad at all" and "I never want to do that again."
Relax the muscle you're injecting into—tensing increases pain significantly. Many of my patients find it helpful to slightly bend their knee when injecting into the thigh, which naturally relaxes the vastus lateralis muscle.
Use a quick, dart-like motion to insert the needle. It might seem counterintuitive, but a swift insertion is less painful than a slow, hesitant one. Insert the needle fully (up to the hub) to ensure proper intramuscular delivery of your At home B12 injection .
The secret to comfort is injecting slowly—take 5-10 seconds for a 1 ml injection. This gives the muscle time to accommodate the fluid without causing that sharp, burning sensation many fear. After injecting, wait a moment before withdrawing the needle to ensure all medication is delivered.
For those still nervous about discomfort, try applying an ice pack to the injection site for 1-2 minutes beforehand. Make absolutely sure the alcohol has dried completely before inserting the needle (wet alcohol can sting when pushed into the skin). Some patients find taking a deep breath and exhaling slowly while inserting the needle helps manage anxiety, while others prefer distraction techniques like watching TV during the process.
With practice, most people become surprisingly comfortable with At home B12 injection . The first few times might feel challenging, but by the third or fourth injection, many of my patients report it becomes almost routine. If you continue to experience significant anxiety or discomfort despite these techniques, don't hesitate to discuss alternative administration options with your healthcare provider or consider our mobile services at AZ IV Medics where we can help with administration.
Safety, Side-Effects, Disposal & Legal FAQs
While at home B12 injection therapy is generally very safe, it's important to understand potential side effects and proper handling procedures. Most people experience minimal issues, but being prepared helps ensure a positive experience.
The most common side effects are quite mild - you might notice some redness or slight pain at the injection site, which typically resolves within a day. Some people experience temporary itching or swelling where the needle entered. Less commonly, you might experience a mild headache, dizziness, or occasional diarrhea after your injection.
Though rare, there are some serious side effects that require immediate medical attention. If you experience any signs of an allergic reaction - such as a rash, unusual itching, or swelling of your face, tongue or throat - seek emergency care right away. The same applies if you develop severe dizziness, breathing difficulties, irregular heartbeat, or chest pain after your injection.
A few special warnings are worth noting. If you have Leber's hereditary optic neuropathy, you should avoid cyanocobalamin forms of B12. Patients with severe megaloblastic anemia occasionally develop hypokalemia (low potassium) when beginning treatment. And if you have heart or kidney conditions, a conversation with your doctor before starting B12 therapy is essential.

From a legal standpoint, B12 injections require a valid prescription in the United States. You should only perform self-injection after receiving proper training from a healthcare professional. And it goes without saying, but sharing injection supplies or medication is both illegal and potentially dangerous.
Proper disposal of your injection supplies is non-negotiable. Never throw used needles in regular trash - always use an FDA-approved sharps container. When your container is full, seal it according to the manufacturer's instructions. You can then return it to participating local pharmacies, medical waste facilities, community drop-off locations, or even mail-back programs in some areas. Your local health department can provide specific disposal guidelines for your area, as regulations do vary.
What If My At home B12 injection Hurts or Bleeds?
Some discomfort during or after your at home B12 injection is perfectly normal, but there are simple ways to manage it. If your injection site hurts, try applying a cold pack wrapped in a towel for about 10-15 minutes. If your doctor approves, taking acetaminophen can help with discomfort.
Sometimes pain comes down to technique - injecting too slowly or at the wrong angle can increase discomfort. Try relaxing your muscle more during future injections, as tense muscles tend to hurt more when injected.
A little bleeding at the injection site is normal and typically stops within a minute or two. Simply apply firm pressure with clean gauze until it stops, then apply a bandage if needed. Some bruising may occur and will resolve on its own - this is particularly common for people taking blood thinners or those with more delicate skin.
When should you be concerned? Seek medical attention if you experience severe pain that doesn't improve within a day or two, signs of infection (increasing redness, warmth, swelling, or discharge), severe or spreading bruising, numbness or severe pain radiating from the injection site, or fever and chills after your injection.
With practice, most people find their technique improves and discomfort decreases. If you consistently have problems, don't hesitate to contact your healthcare provider for a technique review.
Monitoring Results After At home B12 injection
Tracking your response to B12 therapy helps ensure you're getting the benefits you need. I recommend keeping a simple symptom journal noting your energy levels throughout the day, sleep quality, cognitive function (memory, focus, clarity), mood changes, and any physical symptoms like tingling or numbness. Be sure to record your injection dates, sites used, and any reactions.
Regular follow-ups with your healthcare provider are important. They'll likely schedule recommended blood tests to monitor your B12 levels, discuss any persistent or new symptoms, review your injection technique periodically, and adjust your injection schedule based on your results.
Most people begin to notice improvements within 2-4 weeks of starting at home B12 injection therapy. In fact, our patient surveys show that 92% report noticeable improvements by their second check-in. However, if you've had neurological symptoms from long-standing deficiency, patience is key - it may take several months to see significant improvement as your nervous system heals.
FAQs
1. Can I reuse needles for my at home B12 injection?
Absolutely not. Even when used by the same person, needles become dull after just one use and can introduce bacteria into the injection site. Always use a new, sterile needle and syringe for each injection. Your safety is worth the small additional cost of fresh supplies.
2. Can I overdose on B12?
Vitamin B12 is water-soluble, which means your body typically excretes any excess in your urine. There's no established upper limit for B12, and toxicity is extremely rare. However, it's still important to follow your prescribed dosage—more isn't necessarily better, and using only what you need is both medically appropriate and cost-effective.
3. What if I miss a dose?
If you miss a scheduled at home B12 injection , administer it as soon as you remember. However, if it's almost time for your next scheduled dose, simply skip the missed dose and continue with your regular schedule. Don't double up on doses to "catch up." If you frequently find yourself missing doses, it might be worth discussing with your healthcare provider whether your current schedule is realistic or if adjustments would be helpful.
Conclusion
Taking charge of your health through at home B12 injection therapy can be truly empowering. I've seen countless patients transform their energy levels and overall wellbeing once they've mastered this simple skill and addressed their B12 deficiency.
The beauty of self-administered B12 injections lies in their directness—you're bypassing those frustrating absorption barriers that can make oral supplements ineffective for many people. When you deliver B12 straight to the muscle tissue, you're giving your body immediate access to this vital nutrient.
Think about what proper B12 levels could mean for your daily life: clearer thinking, improved energy, better nerve function, and that overall sense of vitality that's been missing. Most patients tell me they wish they'd started sooner!
Of course, success depends on a few essential factors:
Always prioritize proper technique with those sterile supplies we discussed. Your body deserves that level of care! And please, stick faithfully to your prescribed schedule —consistency truly makes the difference between modest improvement and remarkable results.
Keep that symptom journal we talked about. Tracking your progress not only helps your healthcare provider fine-tune your treatment but also gives you those encouraging reminders of how far you've come. And don't forget proper disposal of your supplies—your safety and your community's safety matter.
For those who understand the benefits of B12 therapy but prefer not to self-inject, we at AZ IV Medics understand completely. Not everyone feels comfortable with needles, and that's perfectly okay! Our mobile service brings professional B12 injections right to your doorstep throughout Arizona. Our healthcare team comes to your home, office, or hotel—no travel time, no waiting rooms, just convenient care on your schedule.
To explore our complete range of IV services including B12 injections, or to book your appointment, reach out to us at AZ IV Medics today. We're passionate about making your wellness journey as smooth and comfortable as possible.
Whether you choose the self-administration route or prefer our helping hand, maintaining healthy B12 levels represents a significant step toward reclaiming your energy, mental clarity, and overall health. With the right approach and support, you absolutely can take control of your B12 status and experience the life-changing benefits many of our patients now enjoy.
Related Posts